Masaar · User Guide
User Guide — Masaar
A professional step-by-step guide for building workflow diagrams with Masaar.
What is Masaar?
Masaar is a visual workflow diagram builder designed for food safety (HACCP), quality, and operations teams. Map processes and link every step to hazards, standards, and critical limits via a fast drag-and-drop canvas, with AI auto-generation and professional export.
- ●Build diagrams quickly with drag-and-drop
- ●Organize steps in horizontal, vertical, or parallel groups
- ●Generate full diagrams from natural language with AI
- ●Export to PNG / PDF / JSON in high quality
- ●Full Arabic & English support with RTL
Interface Tour
The Masaar interface consists of five main areas working together for a flexible building experience.
Simplified map of interface areas
Canvas
The main surface where steps are added, dragged, and connected. Supports zoom, pan, and multi-select.
Top Toolbar
Undo/Redo, save diagram to your account, export, and clear all.
Side Palette
A library of ready-made steps categorized (HACCP, Flow, Communication...) draggable onto the canvas.
Quick-Add Buttons
Appear on the edges of each step to add a connected next step in any direction.
Smart Action Bar
Opens a dialog to create a group or insert steps with advanced settings in one go.
Side Toolbar
The vertical bar on the left of the canvas hosts every secondary tool: library, AI generation, freehand drawing, images, shapes, and more. Each icon opens a dedicated panel or dialog.
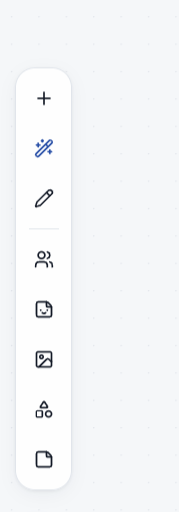
Vertical side toolbar on the left of the canvas
+ Library
Opens the ready-made steps library (HACCP, Flow…). Drag any item onto the canvas.
✨ Smart Action / AI
Auto-diagram dialog to generate from natural text, JSON, or a file.
✏️ Freehand
Draw lines or handwritten notes on top of the canvas with a digital pen.
👥 Grouping
Gather the steps in a group
📄 Work Note
Add a yellow Instructions card or a blue Parameters/limits card.
🖼️ Image
Upload an image (logo / reference diagram) and place it on the canvas.
⬡ Shapes
Geometric shapes (rectangle, circle, rhombus…) for grouping areas.
🏷️ Stickers / Icons
Single icons used as decorative markers over the diagram.
Adding & Customizing Steps
There are three ways to add a step: drag from the palette, click the Quick-Add button on the edge of an existing step, or use the Smart Action. Every step is fully customizable: label, icon, color, and type.
- 1Open the Palette from the side button and drag any item onto the canvas.
- 2Hover over an existing step → '+' buttons appear on all four sides. Click any to create a connected new step in that direction.
- 3Click a step to select it, then use the floating toolbar to change color, icon, or delete it.
- 4Double-click a step title to edit the text inline.
Node Anatomy & Full Customization
Every step (node) in Masaar is composed of several interactive elements that can be edited independently. Selecting a node reveals a floating toolbar above it that gathers all customization options in one place.
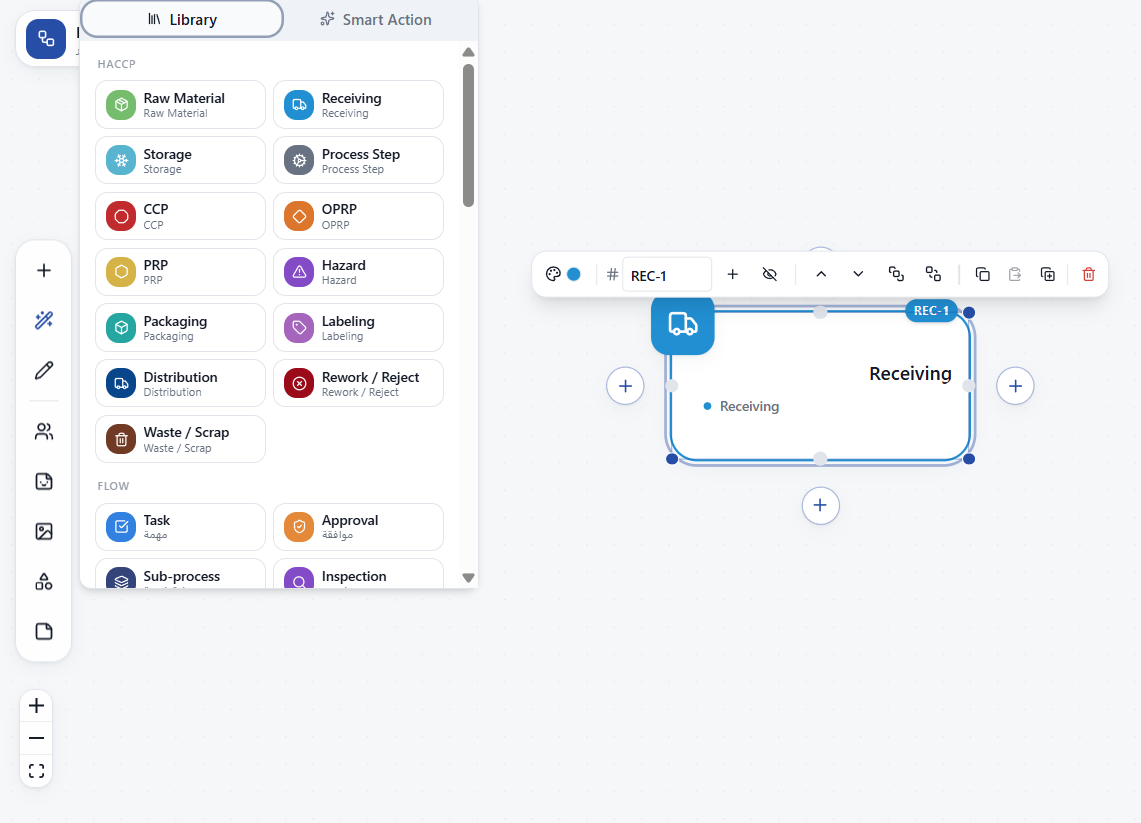
A step node with its floating toolbar and the types library
Node parts
Icon / Logo
The colored square in the corner. Click it to open the Icon Picker and choose from hundreds of categorized icons. Logo size auto-scales with the node size.
Title
The main line. Click once to select the node, then click inside the title to type directly.
Label
The small line below the title with a colored dot. Reflects the step type (Task, CCP…) and can be replaced with custom text.
Code Badge
The badge above the node (e.g. REC-1). Edited from the toolbar; add multiple codes with '+', or hide via the eye icon.
Connection Handles
Four edge points to connect nodes. Drag from one handle to another to create an edge, or click '+' to spawn a connected node.
Resize Handles
Appear at the corners when selected. Drag to freely resize the node.
Floating toolbar
🎨 Color
Six preset colors (blue, slate, emerald, amber, rose, violet) + reset button.
# Code
Field to type the step code. The '+' button adds an extra code (for steps with multiple classifications). The eye icon shows/hides all codes.
▲▼ Layer Order
Bring forward / send backward one layer, or jump fully to front/back.
⧉ Duplicate / 🗑 Delete
Quickly duplicate the step with all its settings, or remove it permanently.
Work Instructions & Control Parameters
Beside the steps, Masaar provides two specialized cards to document the operational information tied to a step or zone — the Parameters card and the Instructions card.
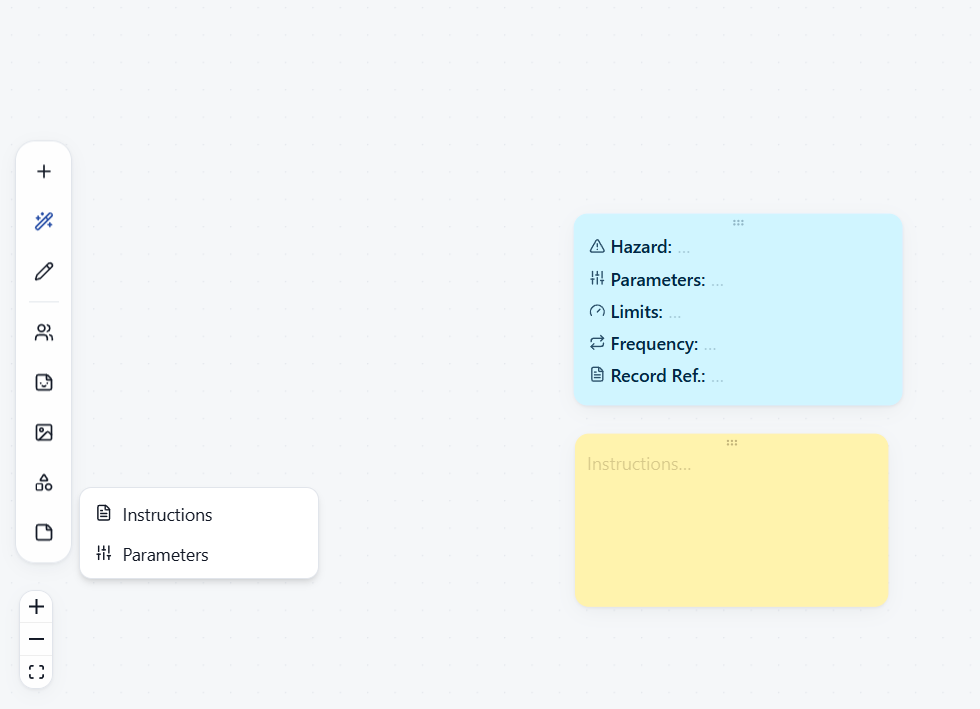
Parameters card (blue) and Instructions card (yellow)
Parameters Card — Blue
Designed for Critical Control Points (CCP) and Operational Prerequisite Points (OPRP). Comes with ready fields: Hazard, Parameters, Limits, Frequency, Record Ref. Each field is edited inline with a single click.
Instructions Card — Yellow
A free-form sticky note for Standard Operating Procedures (SOP), operator notes, or any extra instructions. Type freely as you would on a paper sticky note.
How to add
- 1From the side toolbar click the '📄 Work Note' icon.
- 2Choose 'Parameters' for critical limits or 'Instructions' for free notes.
- 3The card appears on the canvas. Drag it by the dotted handle on top next to any step.
- 4Click any field to edit it inline — no dialog needed.
Groups
Groups bundle related steps inside a single movable, resizable container. They keep the diagram organized and highlight major stages.
The three group orientations
Horizontal
Steps inside the group flow left-to-right (or reversed in RTL). Best for short sequential flows.
Vertical
Steps stack top-to-bottom. Best for long lists and audit stages.
Parallel
Steps execute in parallel from a single entry point. Useful for concurrent tasks.
Parallel Pattern with Convergence Step
NewThe parallel pattern lets multiple steps execute simultaneously from one entry point, then converge into a single 'convergence step' before continuing. This is the standard pattern for concurrent production-line and approval operations.
Structure: entry → parallel branches → convergence step
- 1Create a new group via the Smart Action and choose 'Parallel' orientation.
- 2Enable the 'Convergence step inside group' toggle — available per-group.
- 3Set the convergence step name (default: 'Converge').
- 4The parallel branches are generated and automatically converge into the merge step on the flow axis.
AI Auto-Diagram
Generate a complete diagram in seconds instead of building manually. Four modes available:
AI Text
Write a process description in plain language and let the AI generate groups and connections.
Builder
Define step count, groups, and direction manually in a structured form — no JSON needed.
Structured JSON
Paste a JSON structure that defines nodes, groups, and links precisely.
Upload File
Upload a previously exported diagram (JSON) to restore or edit it.
Auto-Diagram Dialog — In Depth
The 'Auto-Diagram' dialog has four tabs covering every creation scenario. At the bottom you always find the 'Mode' selector: either append to the current diagram or replace it entirely.
The four tabs
AI
Open-text description field. Write the process in plain language and click generate.
Builder
Structured form with no code — detailed below.
JSON
Text editor to paste JSON in the Masaar schema (see FAQ for the template).
Upload
Drag or pick a .json file previously exported from Masaar.
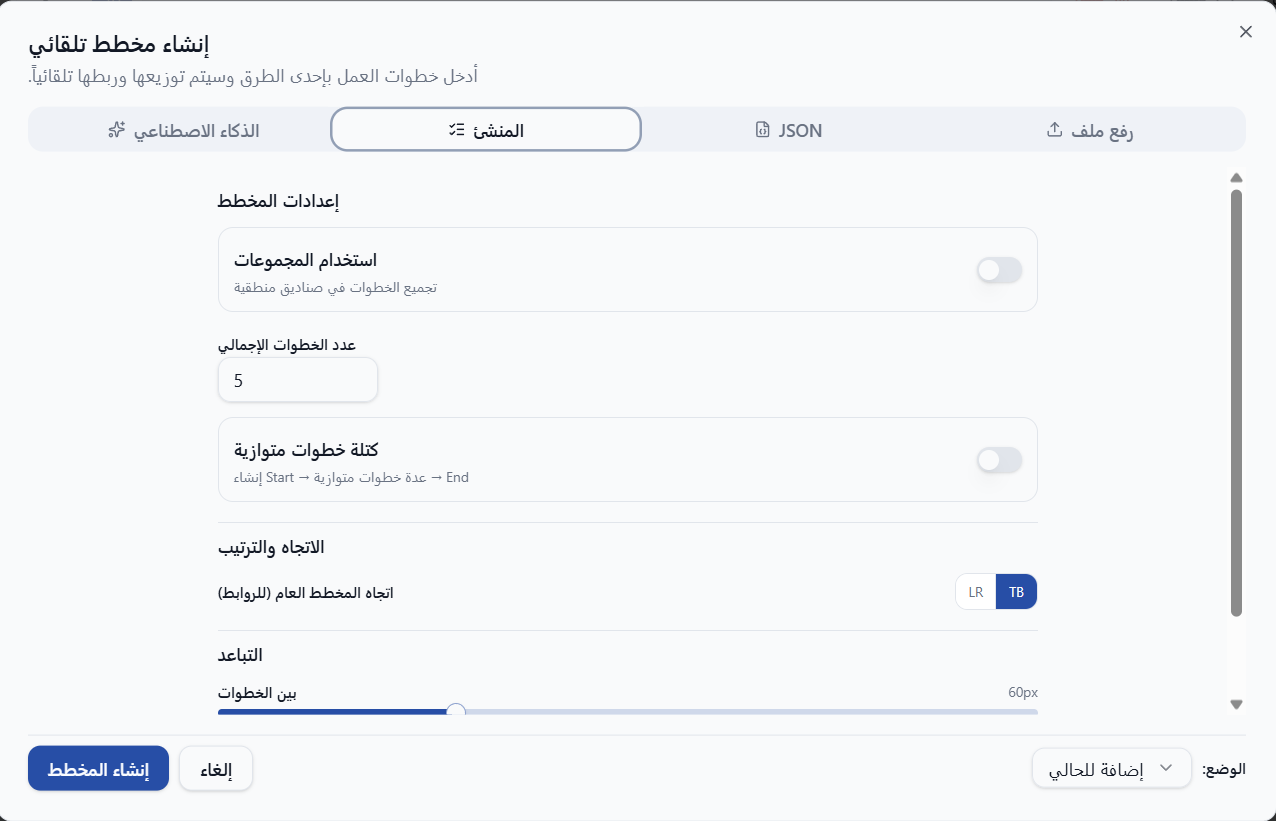
Builder tab — basic settings
Basic builder settings
Use Groups
Toggle that switches the form from a flat steps list to organized groups.
Total Steps
Numeric field controlling total nodes to generate.
Parallel Block
Toggle that produces a Start → multiple parallel branches → End structure in one go.
Direction (LR / TB)
Overall flow direction: left-to-right or top-to-bottom.
Step Spacing
Slider (px) controlling the distance between nodes.
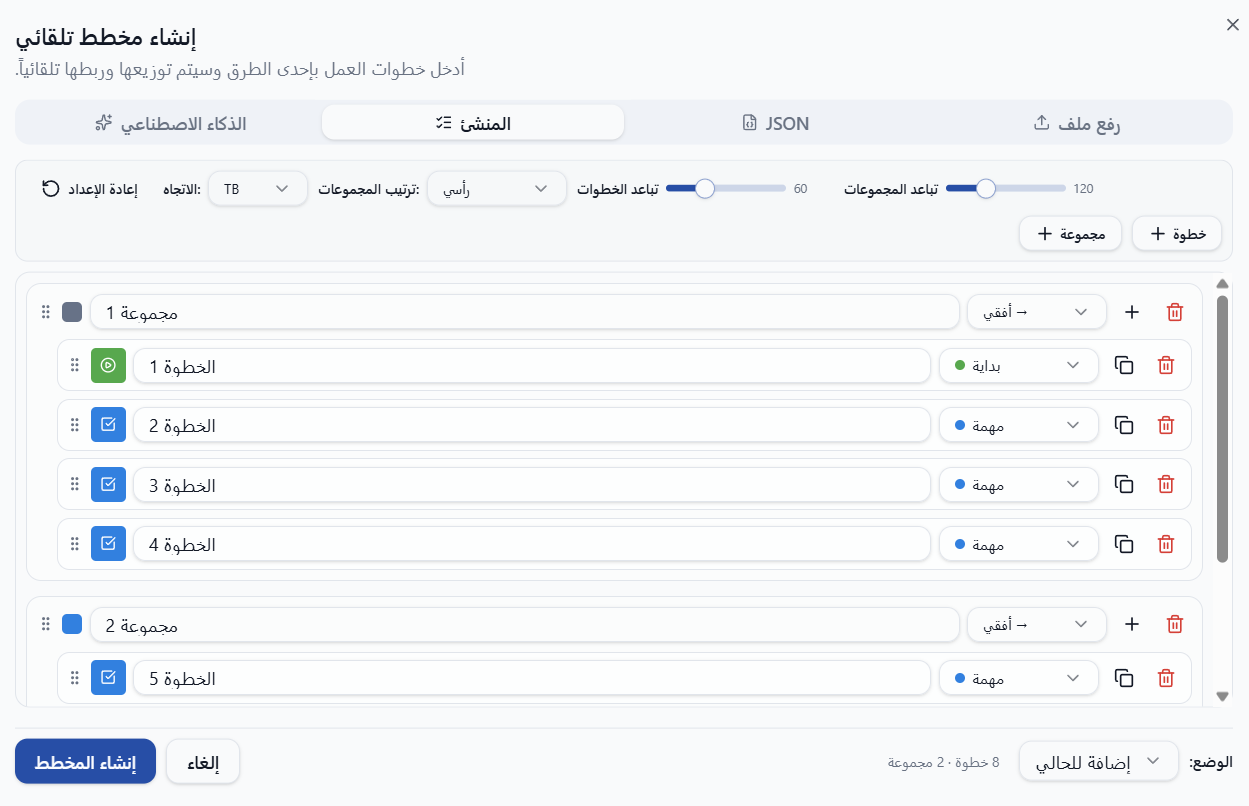
Builder tab — with groups enabled
Groups & steps setup
Top controls
Direction, group ordering (vertical/horizontal), step spacing, group spacing, and reset button.
'+ Group' / '+ Step' buttons
Add a new group or a step inside the last group.
Group card
Group name, orientation (Horizontal/Vertical/Parallel), convergence-step toggle, and delete button.
Step card
Step name, step type (Start, Task, CCP, End…), duplicate, and delete.
Bottom indicator
Shows total 'X steps · Y groups' for quick verification before generating.
Edges & Connections
Each step has connection handles on all four sides. Drag from any handle to another to create a smart edge that adapts to step positions.
- ●Smart Edges automatically pick the best visual routing.
- ●Click an edge to open options: color, style (solid/dashed/animated), and label.
- ●The 'Renumber' button in the toolbar re-numbers steps based on actual flow order.
Alignment & Distribution
When two or more nodes are selected, a floating align bar appears at the bottom of the canvas. It offers three command groups to keep the diagram visually tidy without manual fiddling.
Horizontal Align
Align elements to the left, center, or right.
Vertical Align
Align elements to the top, middle, or bottom.
Distribute & Equal Gap
Distribute elements with equal spacing (H/V), or set a uniform gap between them. Distribution needs at least 3 elements.
Export & Share
Masaar supports three export formats. Choose the one that fits your use case:
PNG
High-quality (2x) image for presentations and documents. White background, clean borders.
PDF file at the diagram's actual dimensions. Best for archival and professional printing.
JSON
Full diagram data structure. Best for re-importing, backup, or integration.
Keyboard Shortcuts
| Ctrl + Z | Undo |
| Ctrl + Shift + Z | Redo |
| Delete / Backspace | Delete selected |
| Ctrl + A | Select all |
| Ctrl + D | Duplicate selected |
| Space + Drag | Pan canvas |
| Scroll | Zoom in/out |
| Shift + Click | Multi-select |
Frequently Asked Questions
How do I save a diagram and return to it later?+
Click 'Save' in the top toolbar and sign in. All your diagrams are in 'My Diagrams'.
Can I use Masaar offline?+
Yes, after installing as a PWA from the 'More' menu on mobile. Building works offline; cloud save needs a connection.
Is there a usage limit for AI?+
Yes, there's a daily quota per user. You'll see a message when you reach the limit.
How do I restore a JSON-exported diagram?+
Open the 'Auto-Diagram' dialog, switch to the 'Upload' tab, and pick the file.
Does Masaar support direct printing?+
Yes, export as PDF and print, or use your browser's print button.
How can I generate a Masaar-compatible JSON file with any text AI?+
Copy the prompt below and paste it into ChatGPT / Gemini / Claude (or any text assistant), then replace the last sentence with your own process description. The assistant returns valid JSON — copy it, open the Auto-Diagram dialog in Masaar → JSON tab, paste, and click Generate.
You are an assistant that generates workflow diagrams as JSON compatible with the Masaar tool.
Reply with ONLY valid JSON (no explanation, no extra text outside the code block) using the following schema:

{
  "direction": "TB",                  // "TB" top-to-bottom or "LR" left-to-right
  "groupsOrientation": "vertical",     // "vertical" or "horizontal" (ordering of groups)
  "stepSpacing": 60,
  "groupSpacing": 120,
  "groups": [
    {
      "name": "Group name",
      "orientation": "horizontal",     // "horizontal" | "vertical" | "parallel"
      "converge": false,                // true to auto-append a convergence step at the end
      "steps": [
        { "name": "Step name", "type": "start" },      // start | task | ccp | oprp | prp | hazard | decision | end
        { "name": "Step name", "type": "task" }
      ]
    }
  ]
}

My request: "Describe the process here in detail, including stages, control points, inputs, and outputs."
Tip: the more detailed your description (stages, CCP points, inputs, outputs, any parallel steps), the more accurate the diagram structure.